How to install and use the plugin?
End-user guide and Reame.
Doc version 1.0 from 15 May 2024
1. How does our plugin work?
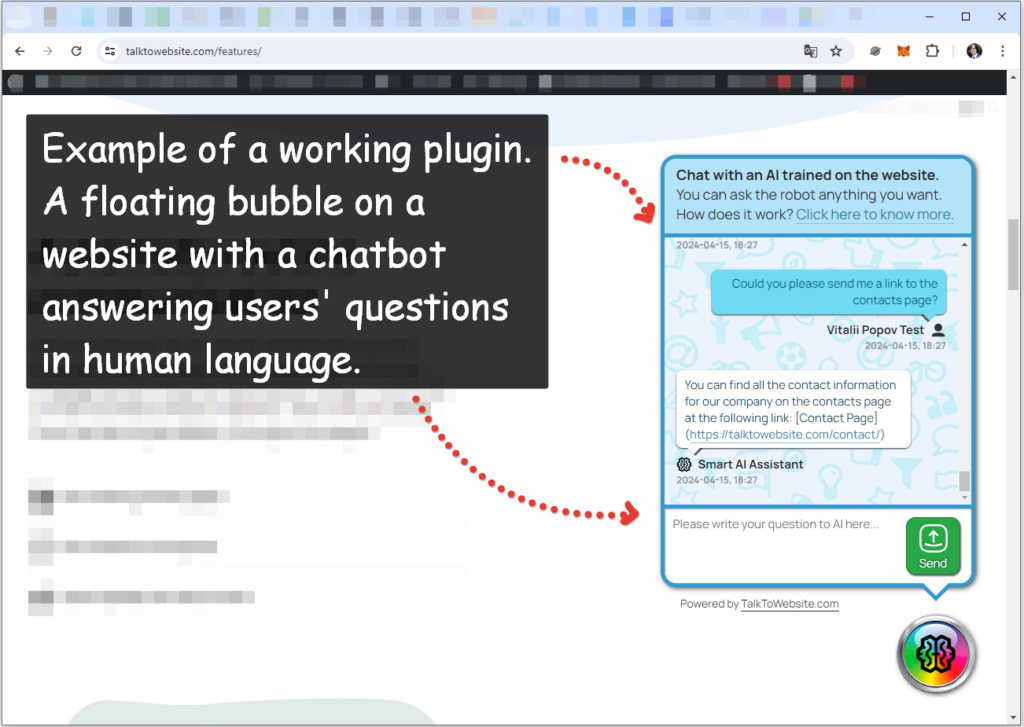
Our plugin is designed to implement AI into your website made on WordPress. It is needed to learn the content of your website and then talk to website visitors in human language. This means that the plugin will answer users’ questions based on your website content, suggest links to specific pages, display your contacts, and do other useful work in advising visitors. The plugin uses OpenAI platform / ChatGPT LLM as its main AI engine. The plugin consists of a public part (a floating online chat window on all pages of your website), and an administrative part (inside which you can customize the plugin the way you want).
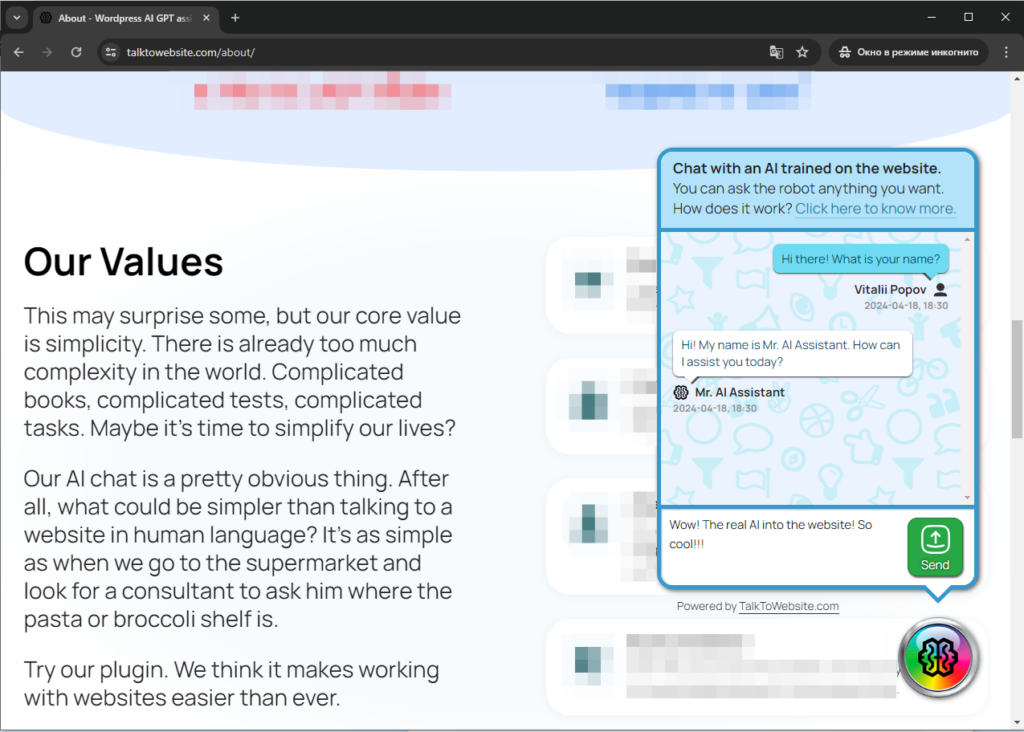
This is what the plugin looks like installed and running on the website (the public part of the website pages, on each of the pages):
For the plugin to work properly, you will need an active account on the OpenAI platform website. Please note that OpenAI’s API is a paid service. The usage fee depends on the number of requests the plugin will send. In turn, the number of requests directly depends on the number of visitors and the number of dialogs. But at the same time, you can set limits on communication with users inside the administrative part of the plugin.
On average, a typical website connected to ChatGPT costs about $0-$2 per day. This amount is roughly equivalent to 20 thousand letters that users will send to chat, and 20 thousand letters that they will receive in response.
2. System requirements
- Website that is made on WordPress
- WordPress 6.0+
- Registered account on OpenAI platrofm
- Positive balance on your OpenAI platform account (at least $5)
- PHP 7.1+
- The CURL library must be installed and enabled on the hosting.
- Permission to create files to the wp-content/plugins/talktowebsite/admin/training. The directory will be available after plugin installation.
- MySQL 8.0 (recommended) / MySQL 5.7 (applicable but not recommended)
- jQuery 3.6+
- JavaScript should enabled on the client’s browser
In a nutshell about the requirements. If you are using a fresh version of WordPress, which is no more than 3-5 years old (at leasr 2017 year +), then most likely everything will work out of the box. Well, if you are using an older version of WordPress – then maybe it’s a good reason to upgrade!
3. Programming language and plugin parts
- Written in PHP v.8 (but fully compatible with PHP v.7.1 standards)
- Based on ChatGPT (uses API of OpenAI platform)
- Uses MySQL DBMS to store data
- Uses HTML5 as layout markup
- Uses jQuery
4. How to install plugin?
4.1. Go to the WordPress administration page (for example – dashboard).
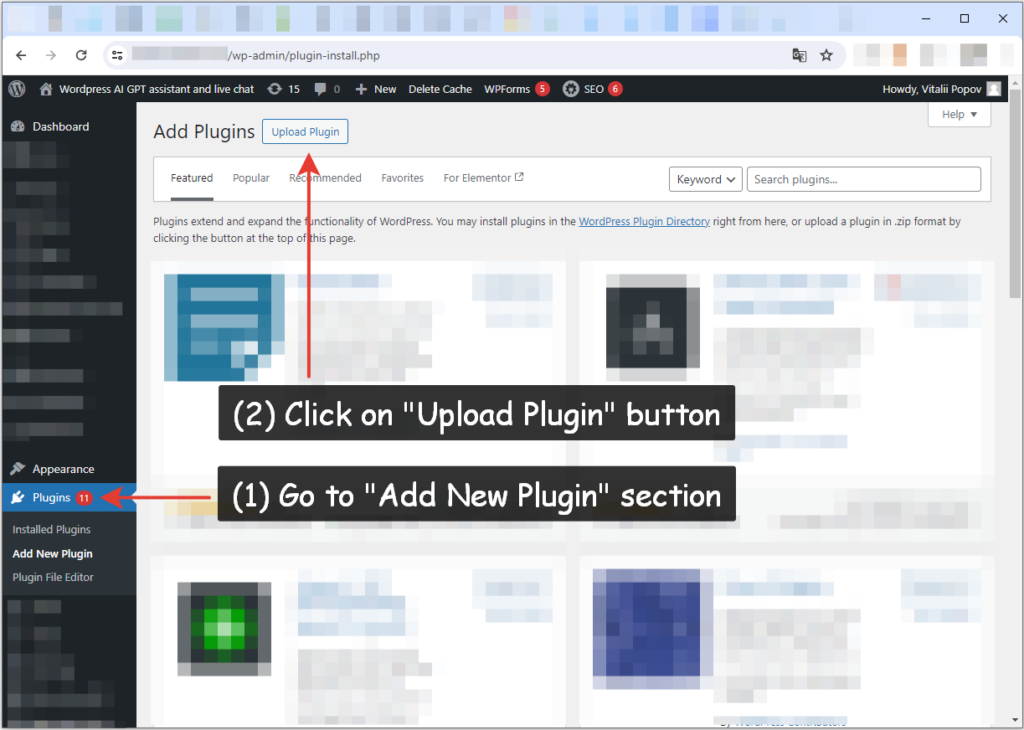
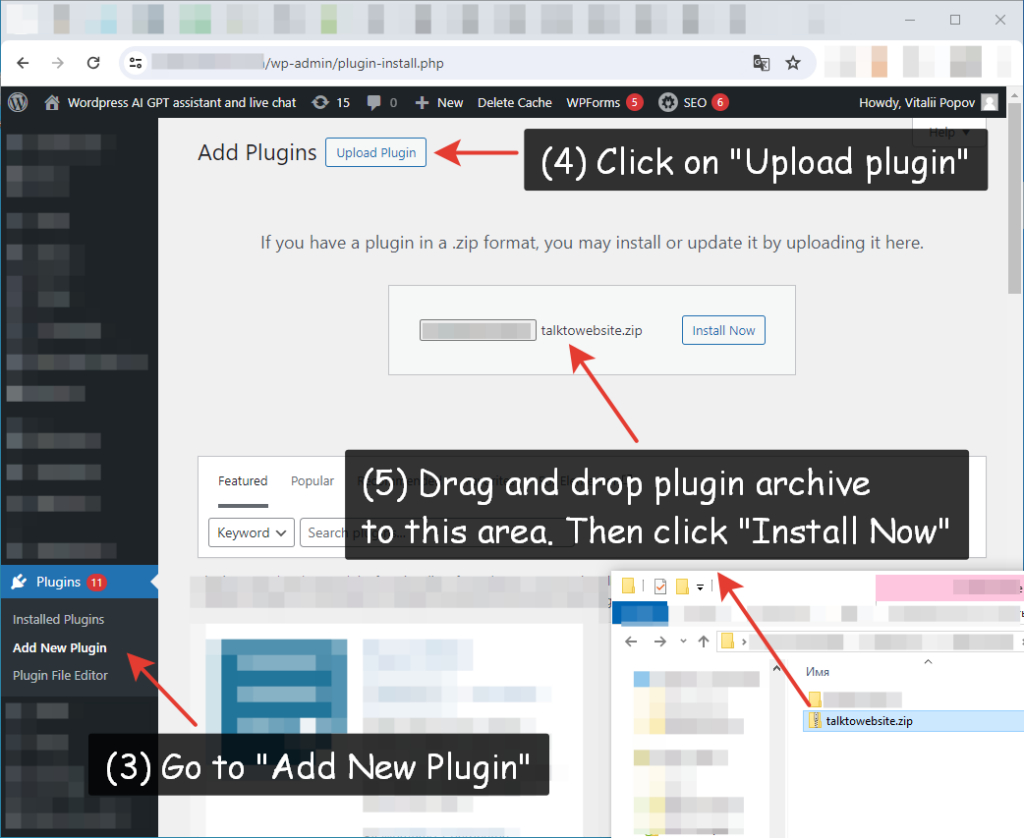
4.2 Go to the “Add Plugins” page (click on the “Add New Plugin” item into left menu).
4.3 Inside the “Add Plugins” page, find the “Upload Plugin” button. Click on it.
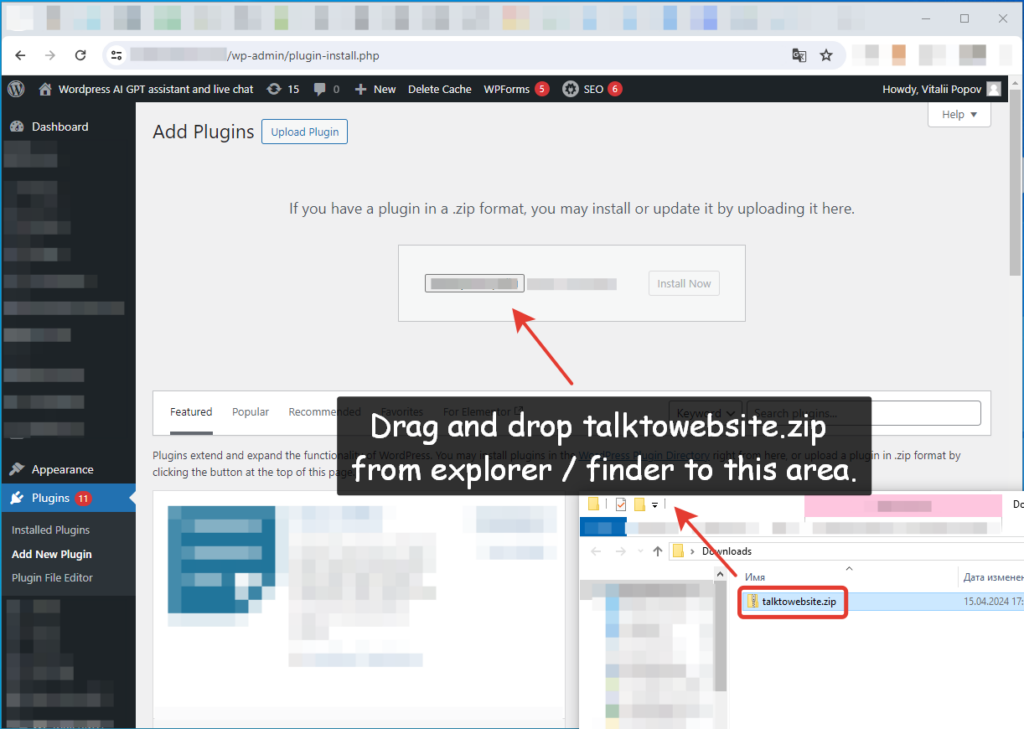
4.4. Drag and drop the “talktowebsite.zip” file from the folder (that you downloaded) into the file download area.
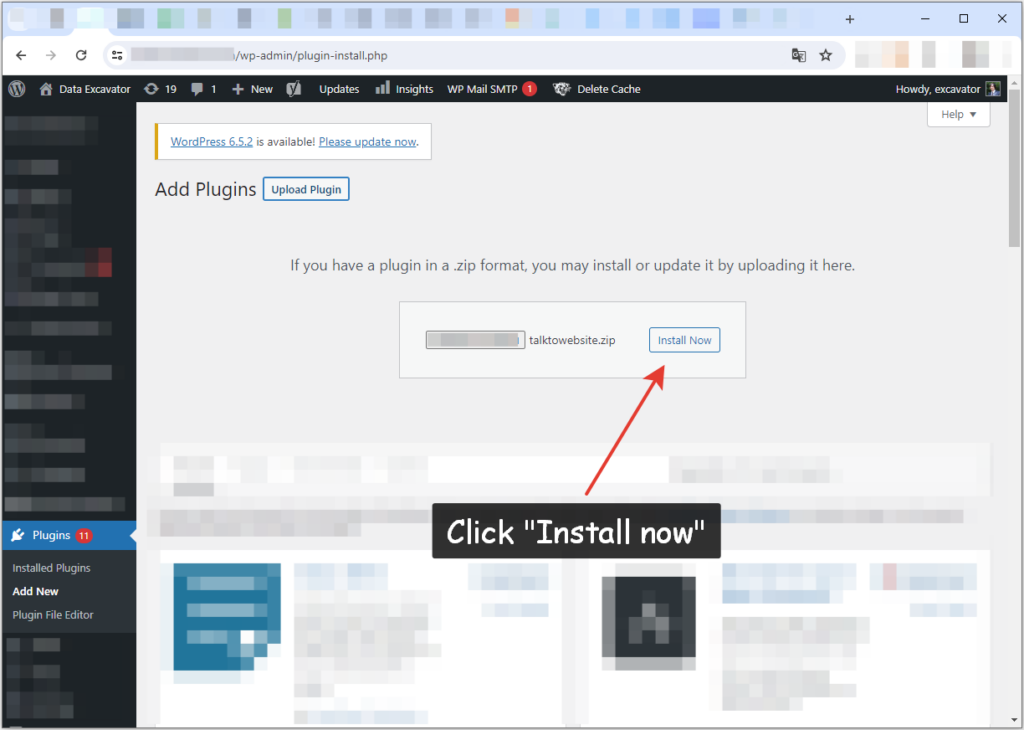
4.5. Click on “Install now” button
4.6. Click on “Activate plugin” to finish installation
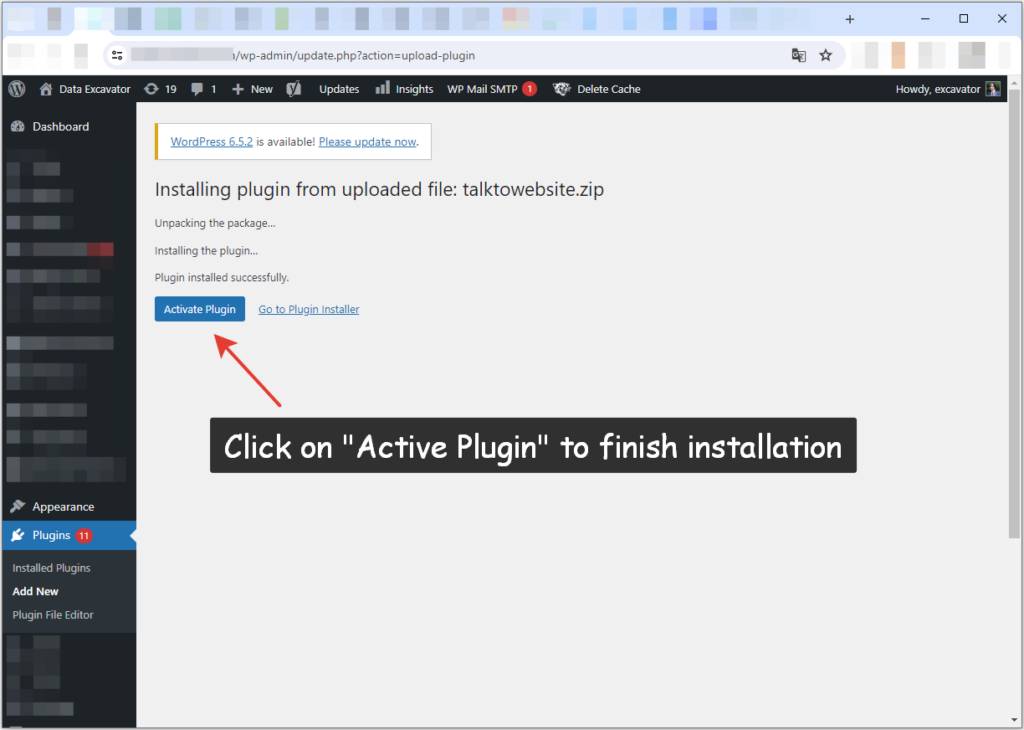
Yay, the plugin has been successfully installed! Now let’s set it up and run it!
5. How to connect the plugin to OpenAI API?
5.1. First of all, please register on the OpenAI platform website. Link: https://platform.openai.com/
5.2. Go to the billing page and topup your balance for ~$10. Link: https://platform.openai.com/account/billing/overview
5.3. Go to API keys section and create new API key. Link: https://platform.openai.com/api-keys
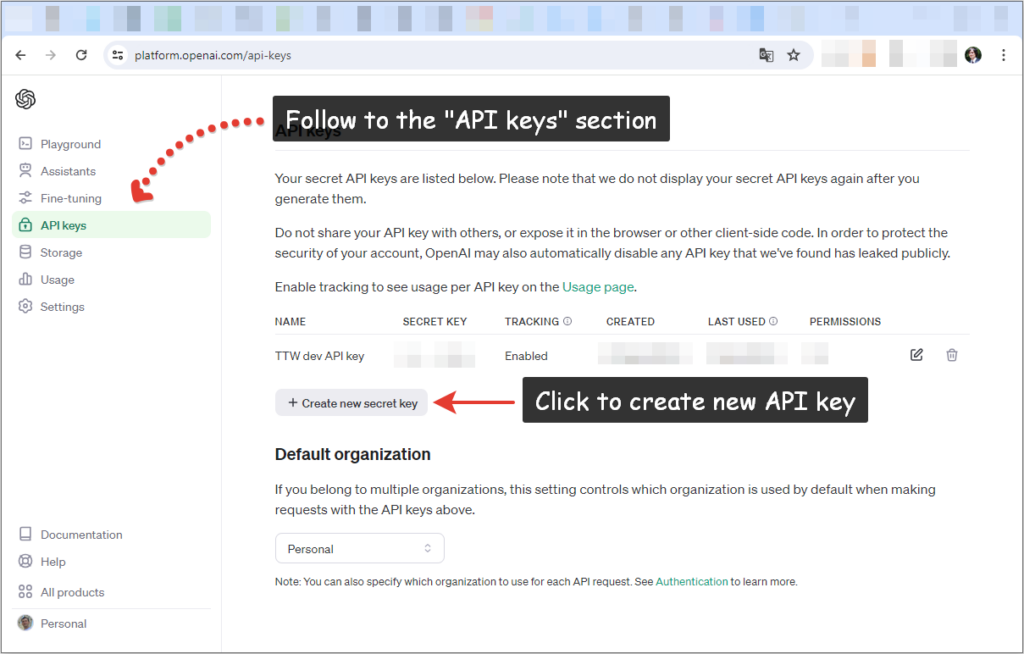
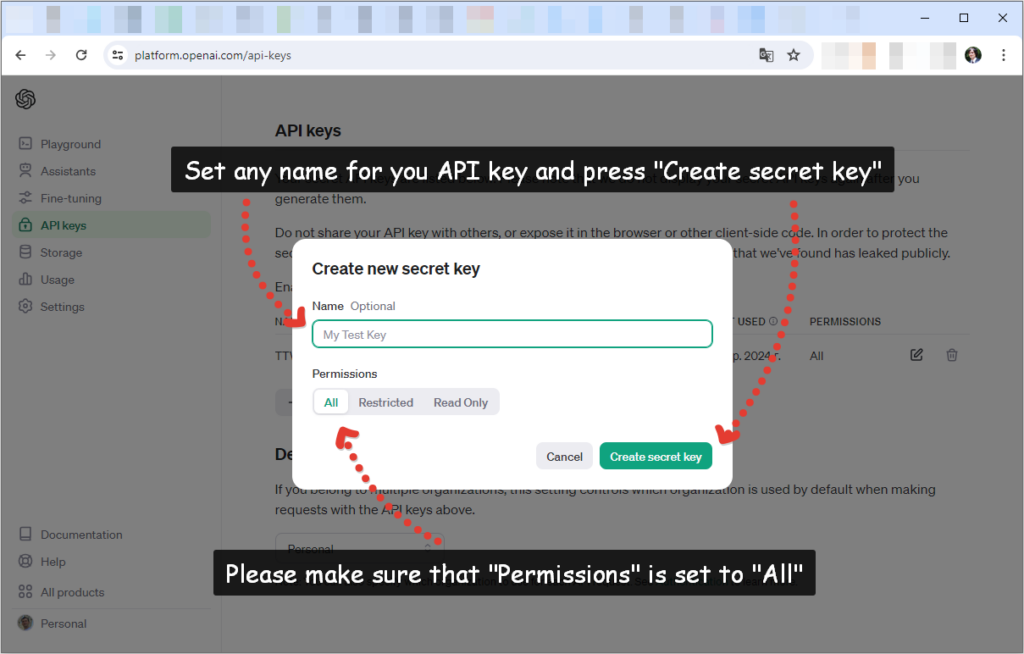
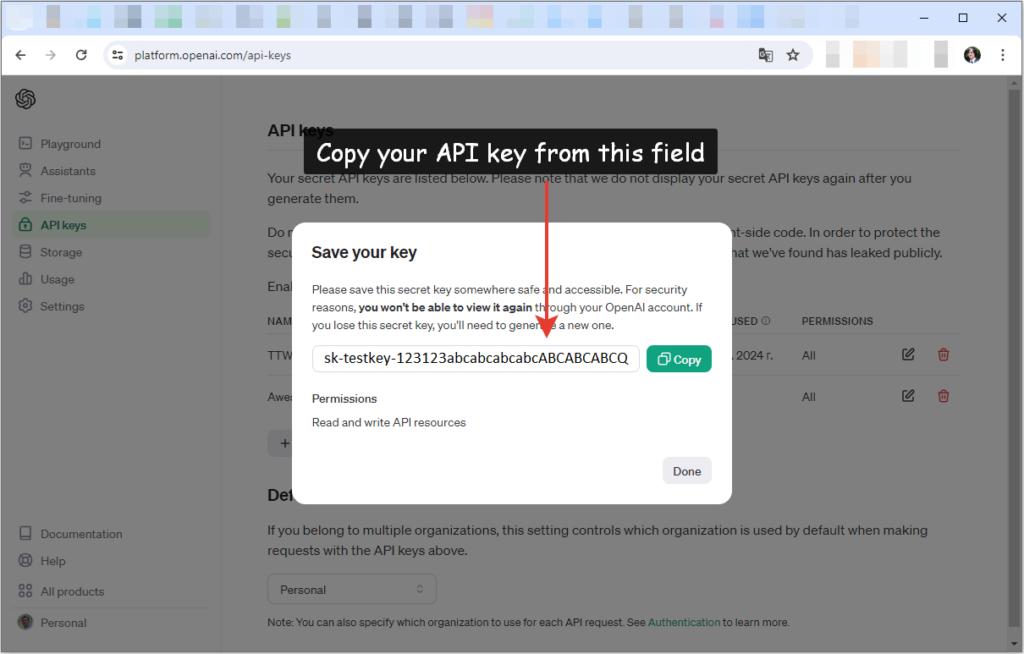
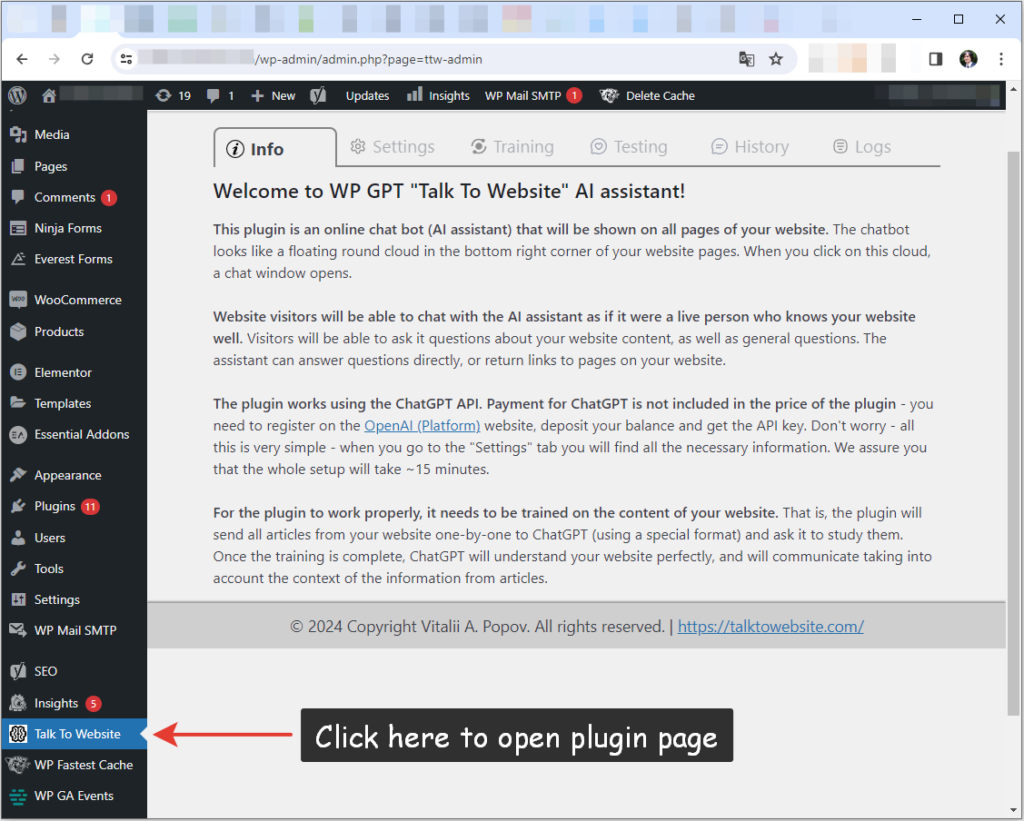
5.4. Open you WordPress website. Go to the “Talk To Website” plugin page.
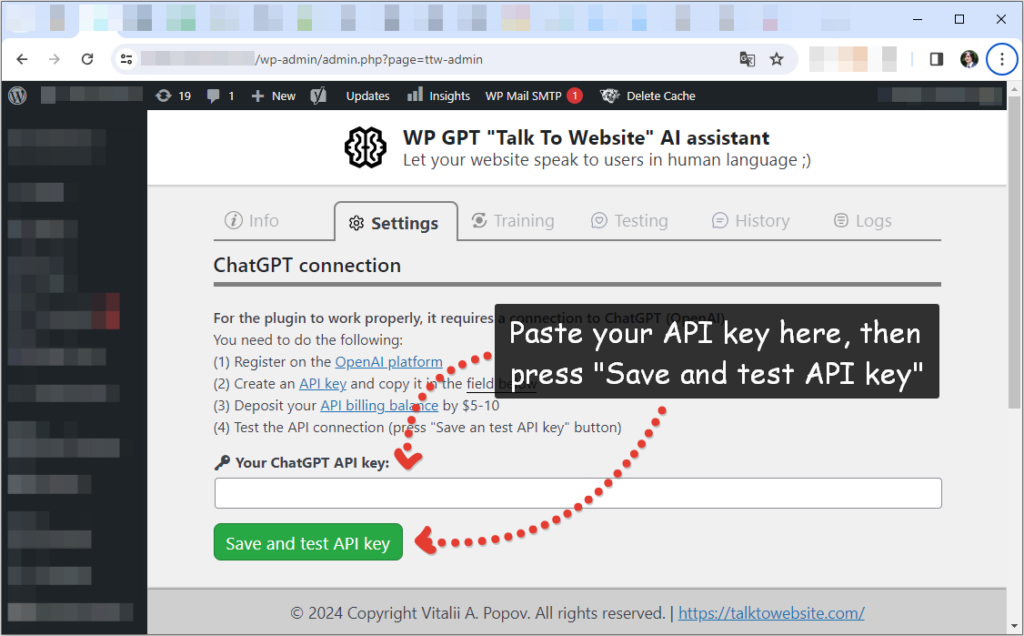
5.5. Open “Settings” tab. Past API key from OpenAI to according field. Then press “Save and test API key”.
If you have done everything correctly, you will see a green box confirming that you have successfully connected to the OpenAI platform. If you see a red modal window with an error, something went wrong. Inside this window there is usually a message with details about the error.
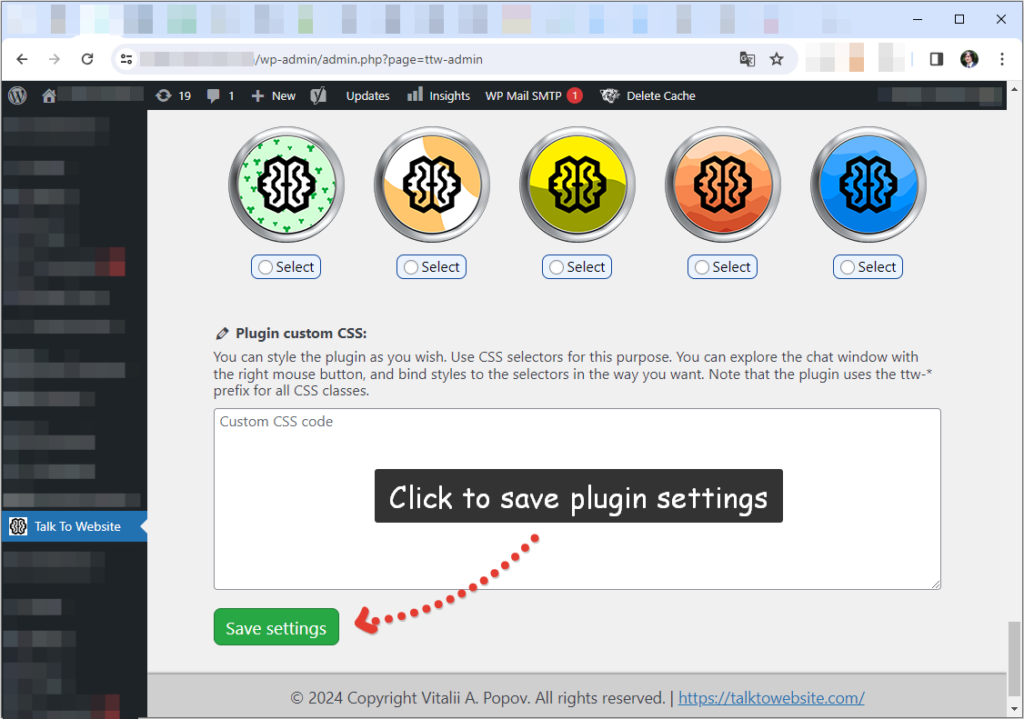
5.6. After saving the key, please check the plugin settings – specify the robot name, and so on. Click on the “Save settings” button at the bottom of the page.
6. How to train the plugin?
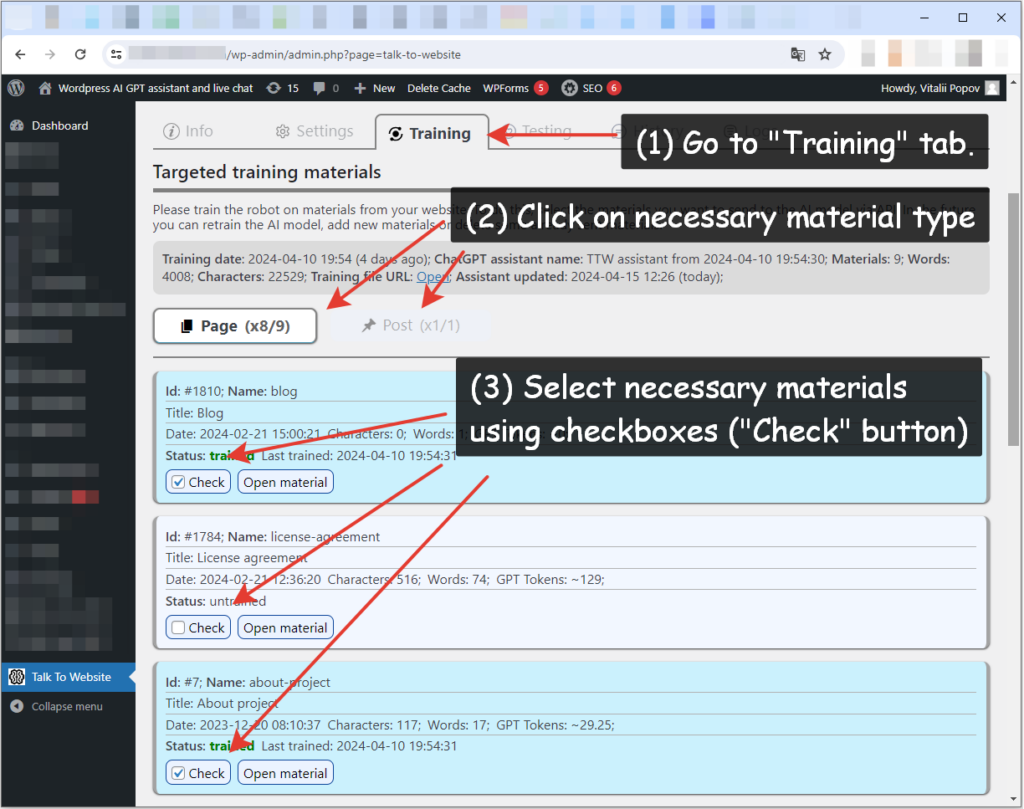
6.1. Click on the “Training” tab. Inside it, you will see sub-tabs with a selection of material types. Inside each sub-tab you will see a list of the corresponding materials, with control buttons. Select the required training materials using the “Check” button.
6.2. Scroll down to the bottom of the page. Click on the “Re-train on checked materials” button. After that, a special JSON file will be generated and sent to OpenAI for training. Please note that the plugin will create a separate assistant inside your account on the OpenAI website, as well as a vector storage and a “file” type object.
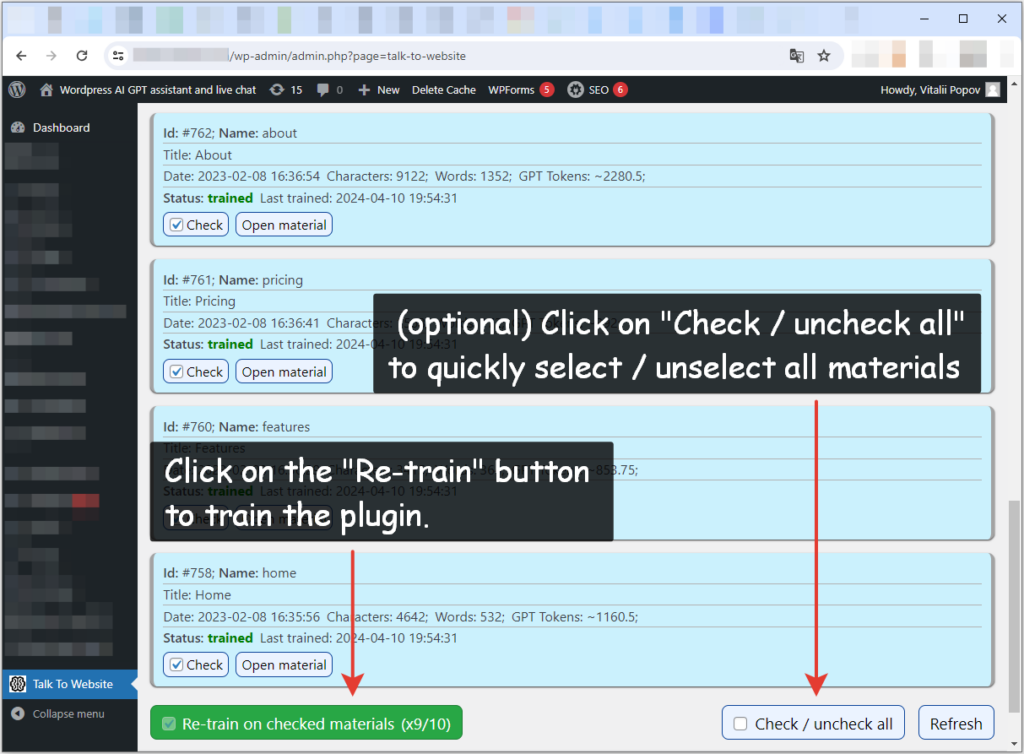
Immediately after training, the plugin is automatically activated. The floating bubble will appear on the public pages of your website and users will be able to communicate with the robot. Don’t forget to set limits in the “Settings” section, and periodically replenish the balance on the OpenAI website. Yay! The plugin has been successfully installed and configured! Welcome to the world of AI websites!
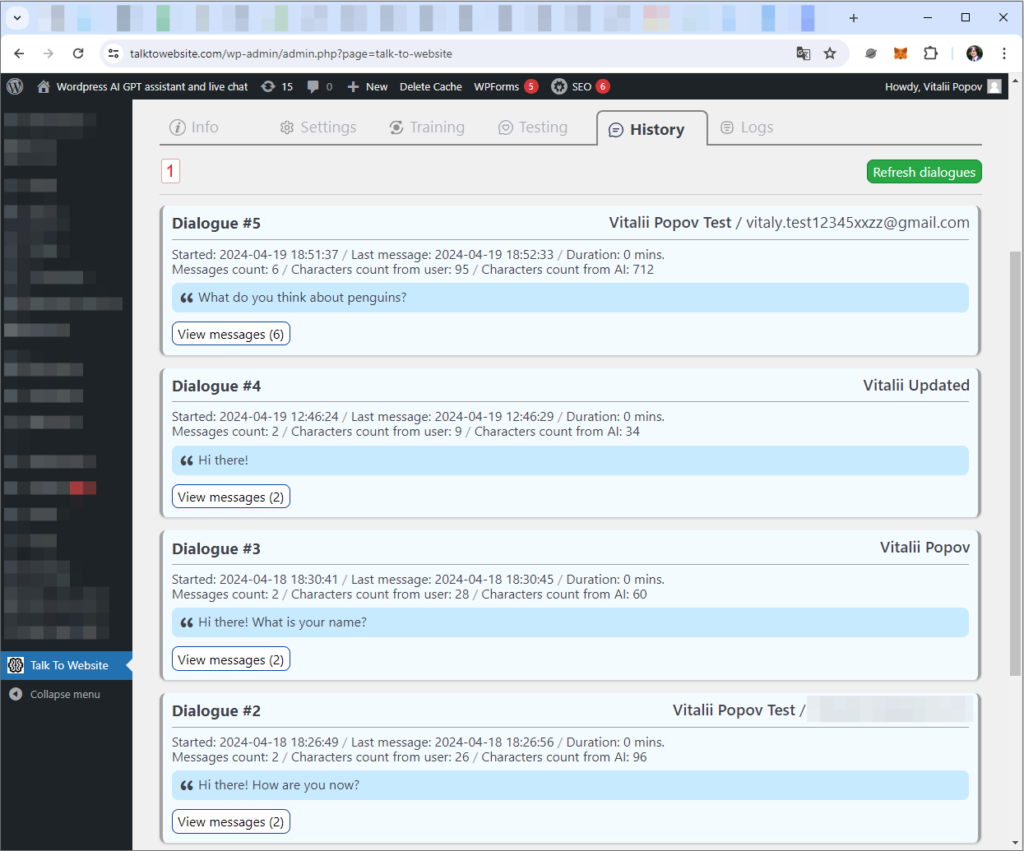
7. How can I see the history of the robot's communication with website visitors?
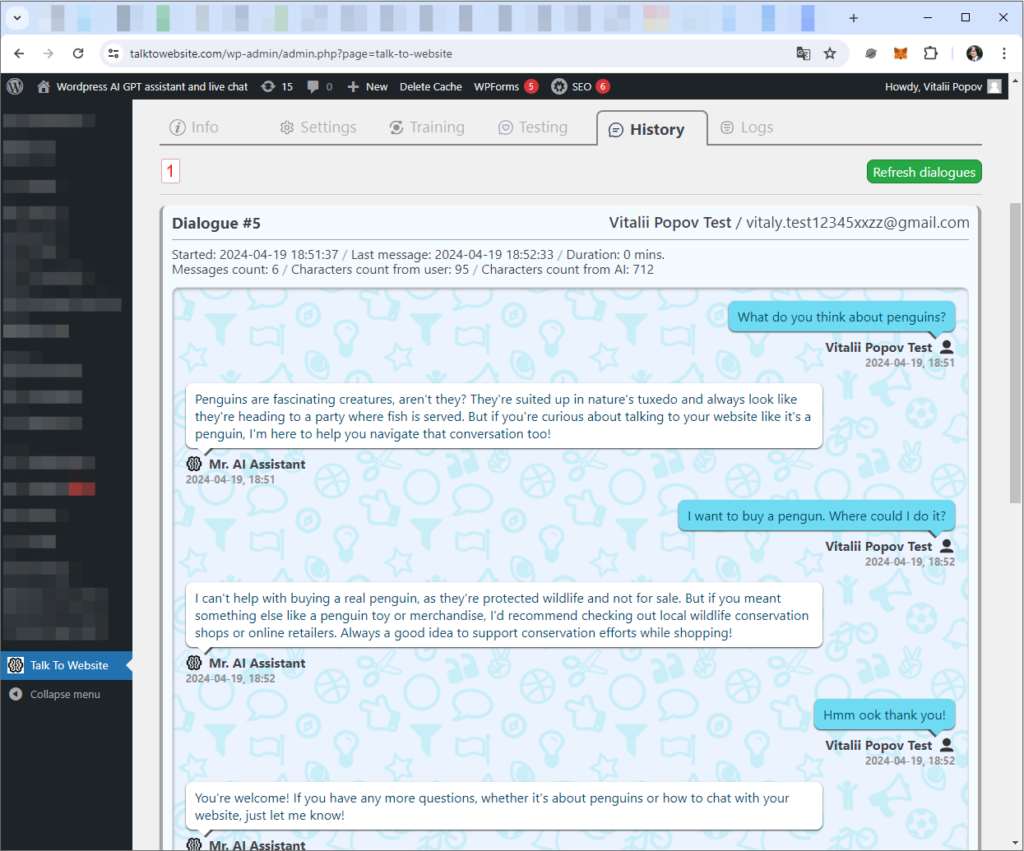
Relevant information about dialogs is located in the “History” tab. A list of so-called “dialogs” is collected and displayed here. One dialog is one session of user interaction with ChatGPT with one “context window”. This means that within one dialog the AI remembers the entire context of the information that the user discussed with it. You can explore the dialogs of the robot with users and, if necessary, make adjustments to the robot’s work and train it in the way you need.
You can click on the “View messages” button and you will see all the messages that the user has sent and all the replies that ChatGPT has given them.
8. What kind of customization does your plugin provide? What should I pay attention to?
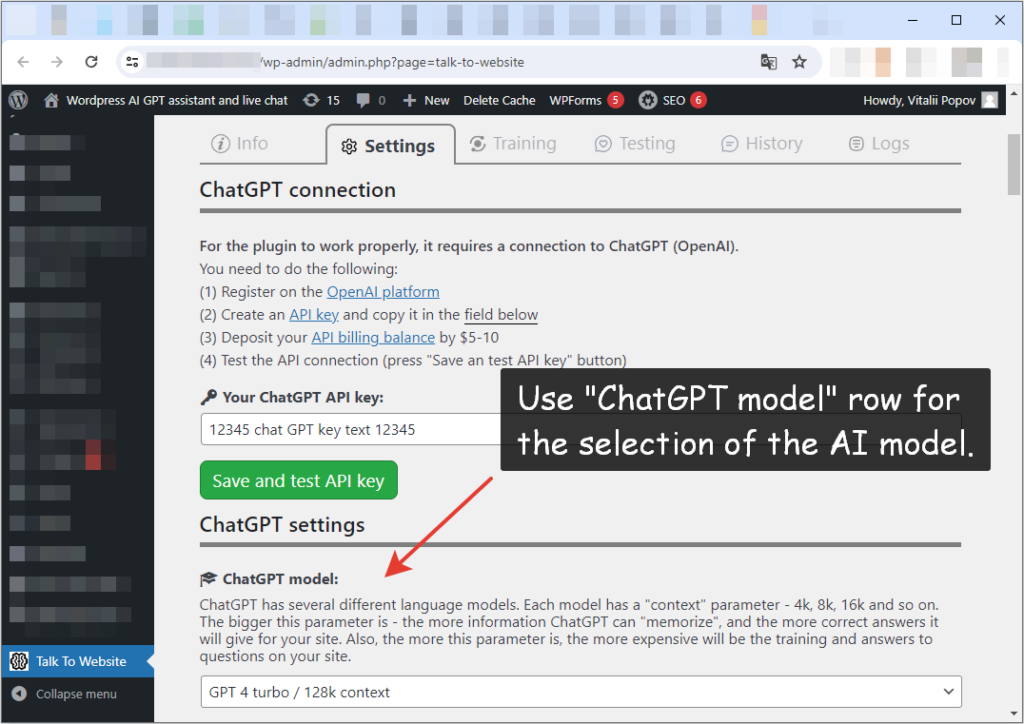
8.1. AI model selection. The difference between ChatGPT-3.5 Turbo, ChatGPT-4 Turbo and ChatGPT-4o.
Inside the plugin settings, you can choose between two AI models. These are either ChatGPT-3.5 Turbo, ChatGPT-4 Turbo or ChatGPT-4o (omni). What is the difference between them? In a few words, the difference is the quality of responses and the cost of responses.
ChatGPT-3.5 Turbo answers in simpler words, and prefers not to communicate on side topics. If it doesn’t find an answer in the materials you have taught it, it will most likely answer “I don’t know” or “try asking another question” and similar answers. Also, the dialog context (the total length of previous messages that the robot will remember when communicating with the user) is 16 thousand tokens (roughly ~12 thousand words).
ChatGPT-4 Turbo responds in a more creative way. With long dialogs, the quality of communication is very similar to live users. If the AI doesn’t know something based on your file, it will in most cases provide an answer from its knowledge base. It is friendlier, more adaptive to the manner of dialog, and smarter in many ways. The dialog context is 128 thousand tokens (conventionally ~90 thousand words).
ChatGPT-4o (omni) is the most advanced and modern model, which was released in May 2024. It not only has the highest quality of responses among other models, but also has much more variability. Among other advantages, its cost is much cheaper than other models.
You can choose the AI model between ChatGPT- 3.5 Turbo, ChatGPT-4 Turbo and ChatGPT-4o in the “Settings” tab, in the ” ChatGPT model:” line.
We recommend using the most current and inexpensive model: ChatGPT-4o (omni).
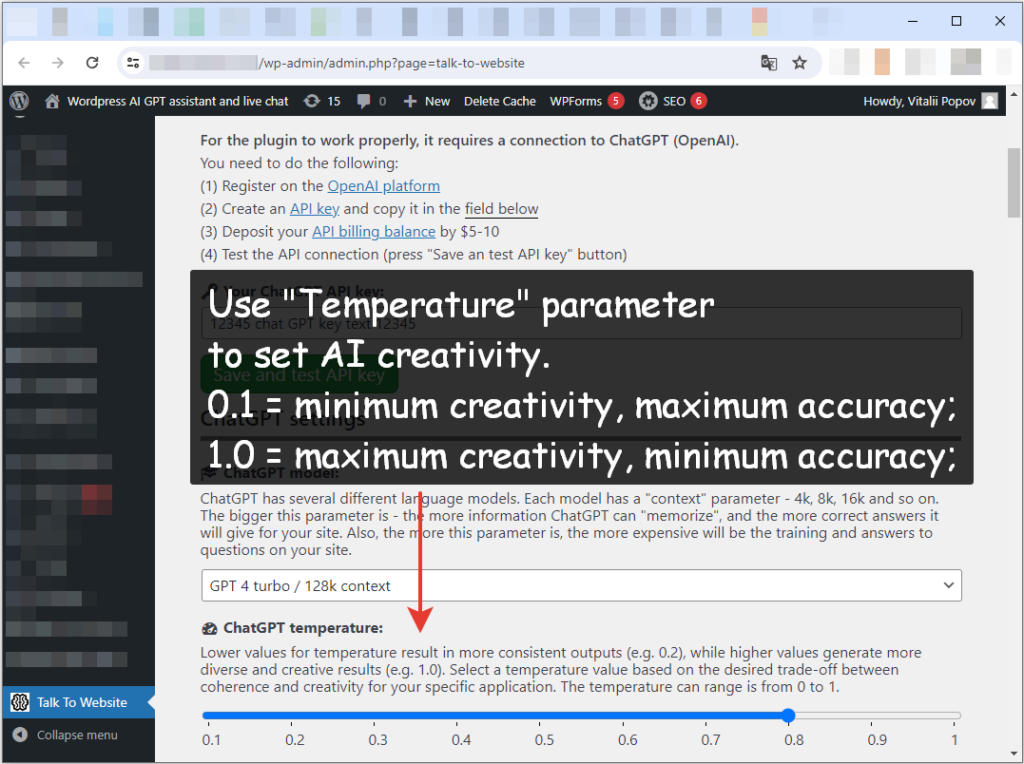
8.2. What is the “temperature” parameter?
The second important parameter to look at is temperature. ChatGPT is designed in such a way that the user can vary the creativity of the responses. The “temperature” is responsible for creativity. This parameter ranges from 0.1 to 1. Where 0.1 is super-accurate responses and 1 is super-creative responses. We recommend setting this parameter to a value of 0.7. In this case, the robot will be quite similar to human behavior, while being “moderately” creative and “moderately” imaginative. If you set it to 1, the robot will just make up stories instead of answers based on the information it has. At the same time, setting it to 0.1 will make it very boring and not human-like.
In general, if your website is about something very precise and very important, you can set the “temperature” parameter to 0.2 or 0.3. If, on the contrary, your website contains some super-creative information, you can set the value to 0.8 or even 0.9. But again, values close to 1 will allow the robot to make up information instead of providing answers based on knowledge from your website.
9. Plugin usage limits / OpenAI API cost
9.1. Cost of using OpenAI API
Our plugin uses the API from ChatGPT. Accordingly, the cost of using the API directly depends on which model you use (ChatGPT-3.5 Turbo or ChatGPT-4 Turbo or CharGPT-4o). Also, the cost depends on how actively users communicate with the plugin. The more messages (text volume) users have sent and the more messages (text volume) ChatGPT has replied to them – the higher the cost of usage will be. We can’t give you the exact cost per “word”, because ChatGPT has different pricing policies for different language models. Also, the cost of APIs is calculated in so-called “tokens”, and the size of a token is not always equal to the size of a word (to be more precise, 1000 tokens is about 750 words). And of course, the cost of their models sometimes changes.
At the current time of writing the Readme (April 2024), the ChatGPT-4 API cost is $10 per 1 million incoming tokens (messages from users) and $30 per million response tokens (messages from ChatGPT) for the ChatGPT 4 Turbo model. The API cost for the ChatGPT 3.5 Turbo model is $0.5 per million incoming tokens, and $1.5 per million response tokens.
You can learn more about the cost of using the different models on the OpenAI website page: https://openai.com/pricing .
9.2. Setting spending limits for OpenAI API
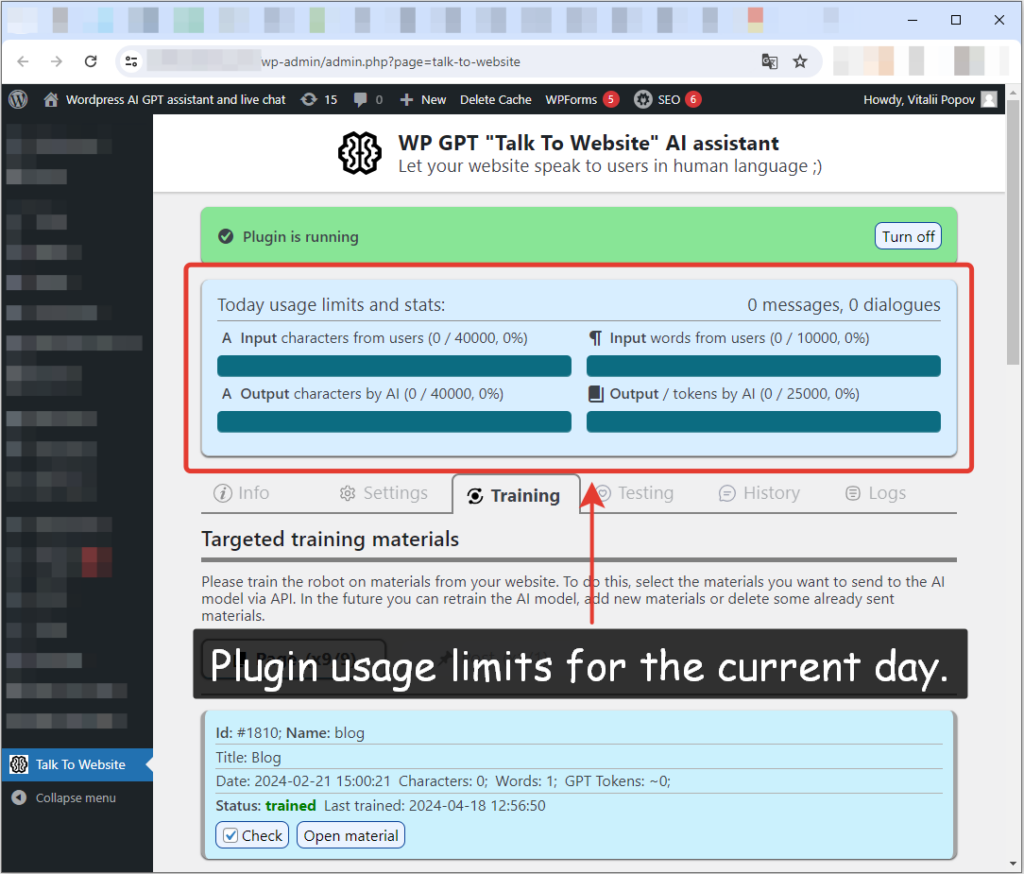
Since the cost of using API from OpenAI directly depends on the activity of your users in the chat – we made functions to customize plugin usage limits. These limits allow you to roughly predict your daily spending, and limit it to the specified values. The limits relate to the number of outgoing messages from users (number of words, number of characters), as well as the number of reply messages from OpenAI (number of tokens, number of characters). Limits are configured in the “Input / output limits” block. Inside this block you can find information about different types of limits, including the limit on the total length of messages from one user.
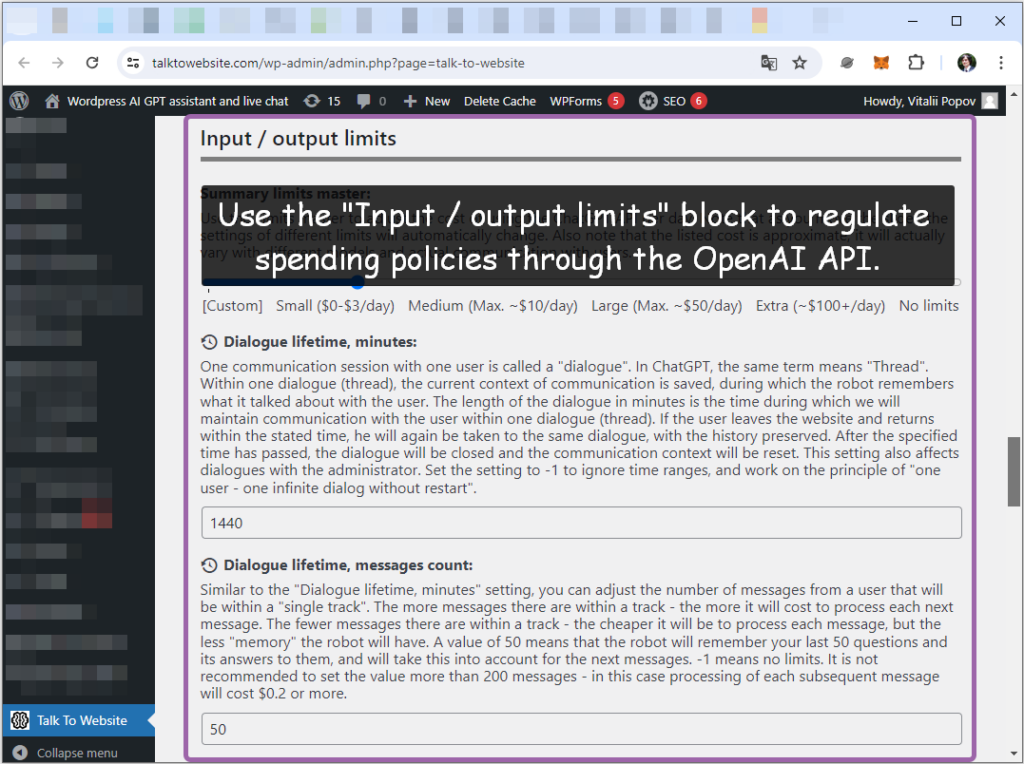
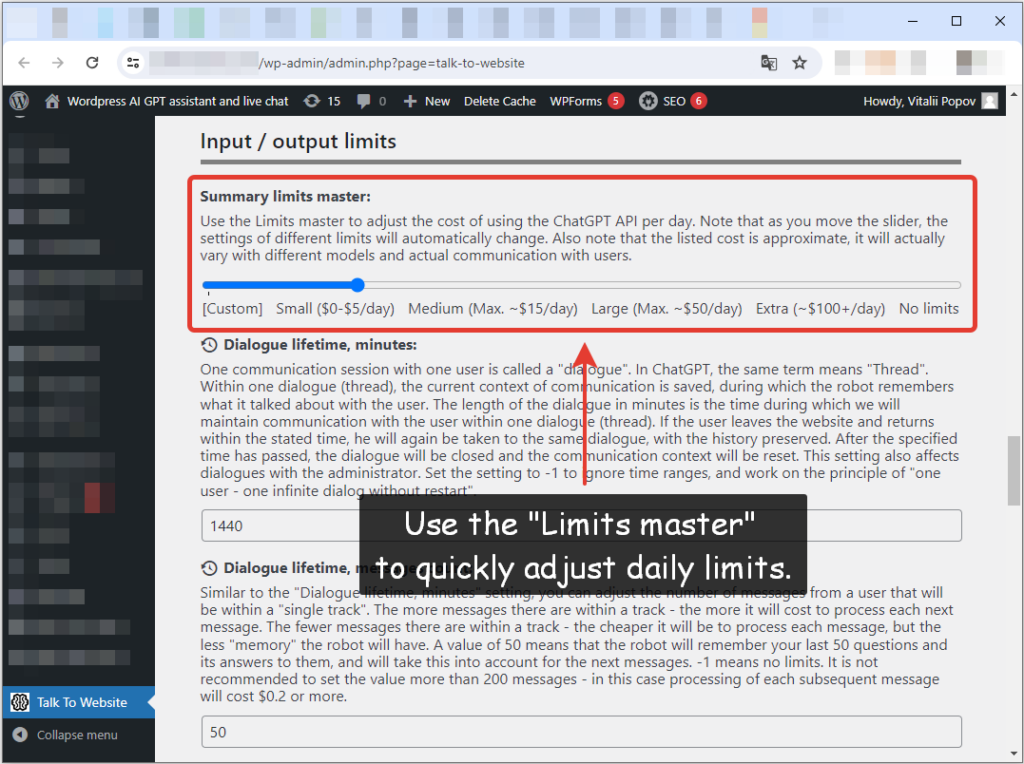
You can adjust the settings yourself to your taste, or use the “settings wizard”. With the help of the wizard you can specify the approximate desired spending per day during the day. The settings wizard is located in the “Summary limits master” block.
After setting the limits and refreshing the page, you will see the current limits block at the top of the plugin management section. Inside it you will see the current spending of limits for the last 24 hours. These limits will be updated every day, at 00:01 hours according to your server time, and will be calculated during the current day, until 23:59.
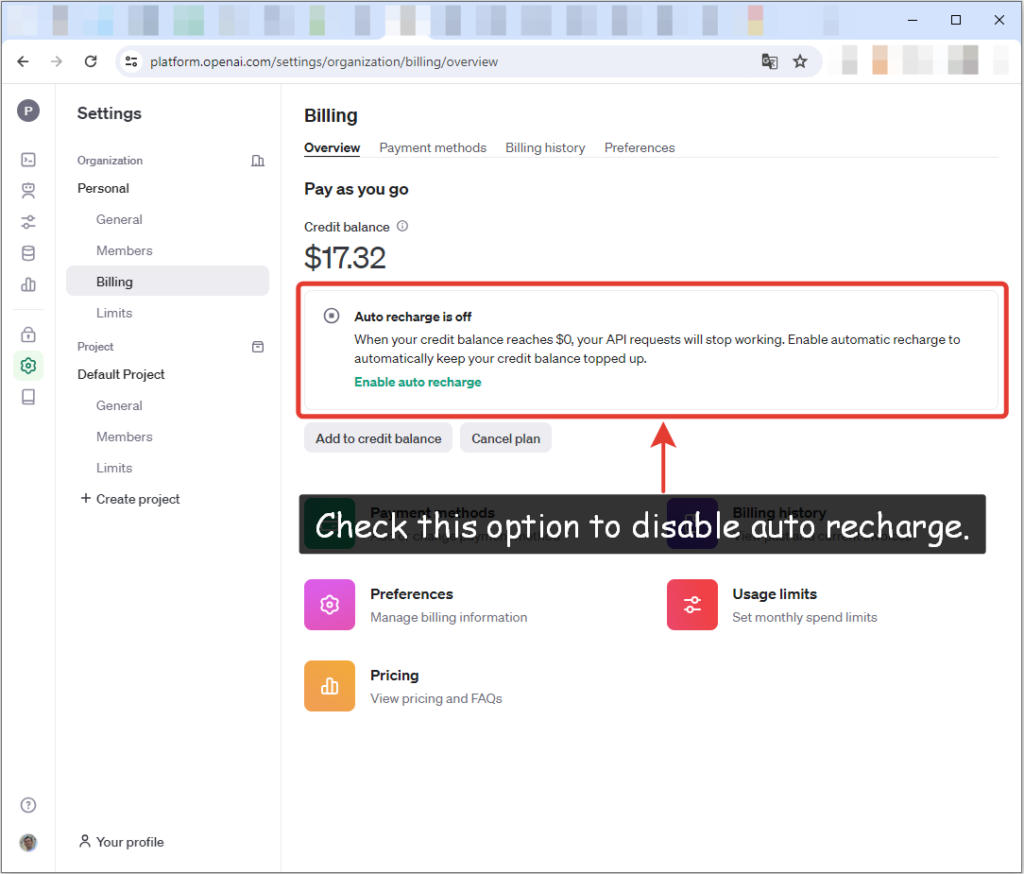
In addition to the limits that can be configured within our plugin, you can also configure some spending limits within OpenAI. In particular, in the top up section you can check the “do not top up automatically from the card when the balance is nearing the end” checkbox. In this case, when the current balance on your account is used up, automatic debiting of funds from your card will not occur. You can make this setting on the page of balance replenishment:
10. How to update the plugin?
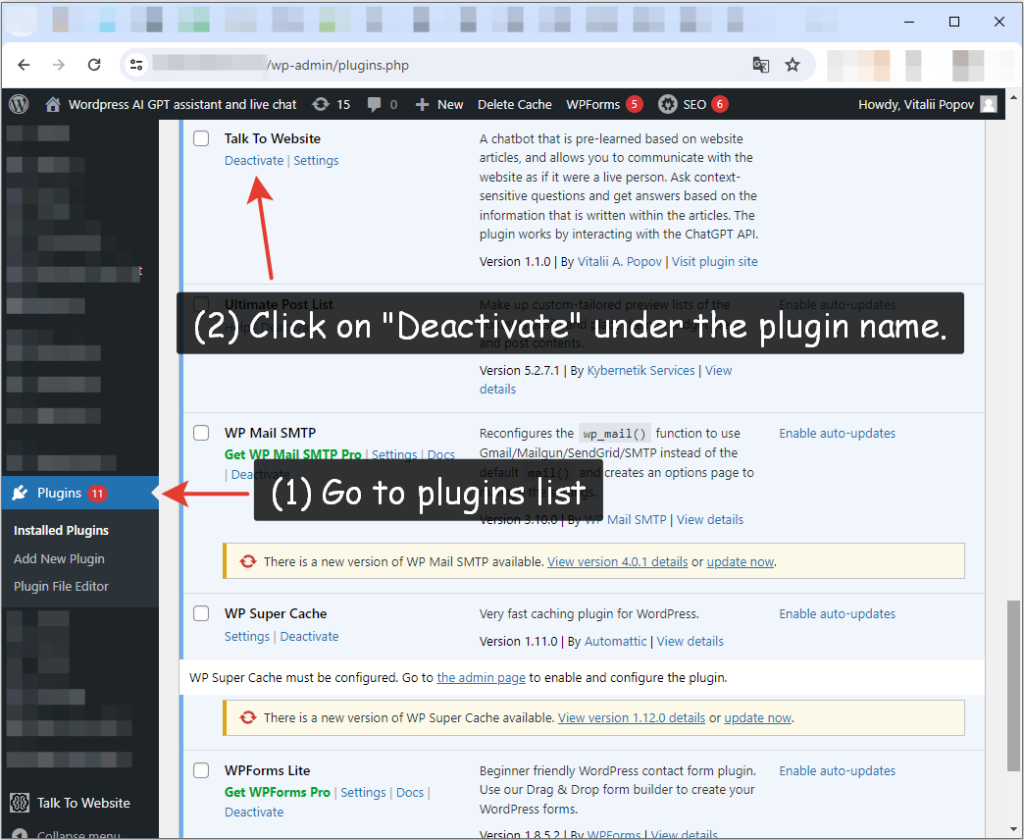
To properly update the plugin, you need to deactivate the old plugin, and then upload the new plugin in the standard way (see previous instruction points). Please note: DO NOT remove the old plugin before updating! In this case, all database tables with the history of correspondence with site visitors will be deleted, as well as the settings DB table. Here’s how to do it correctly:
10.1. Deactivate old plugin
10.2. Go to “Add New Plugin”, then drag-n-drop archive with new plugin.
10.3. Confirm plugin replacement
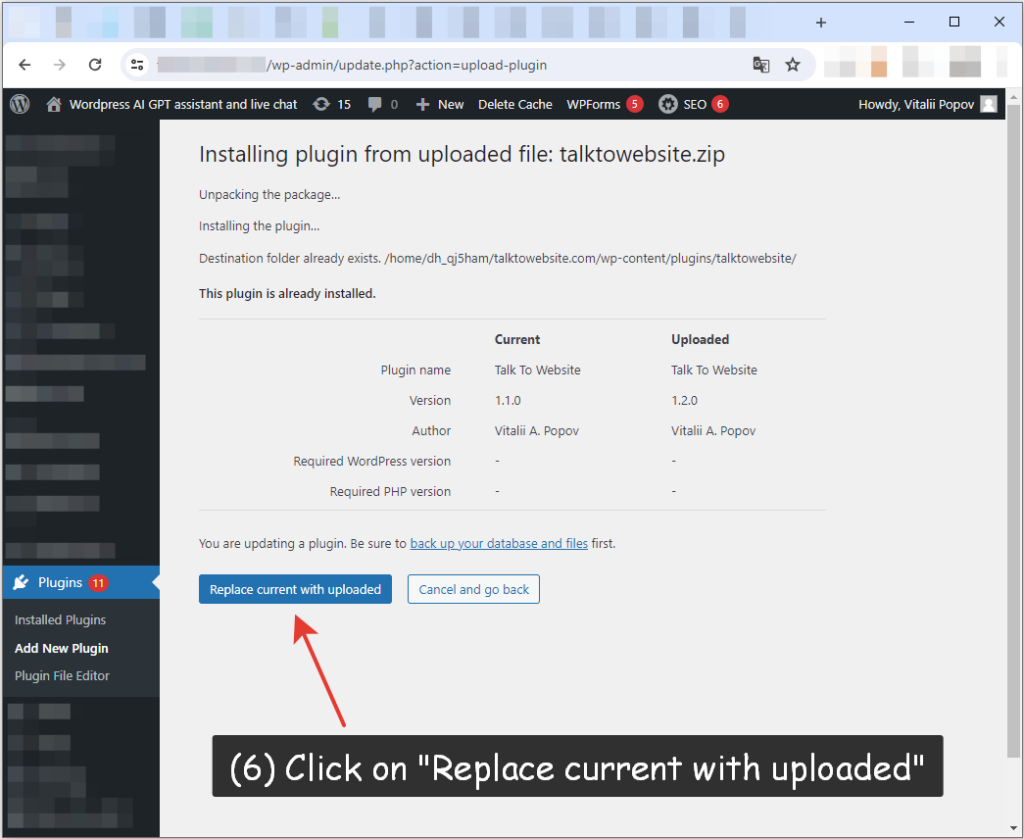
10.4. Activate new plugin
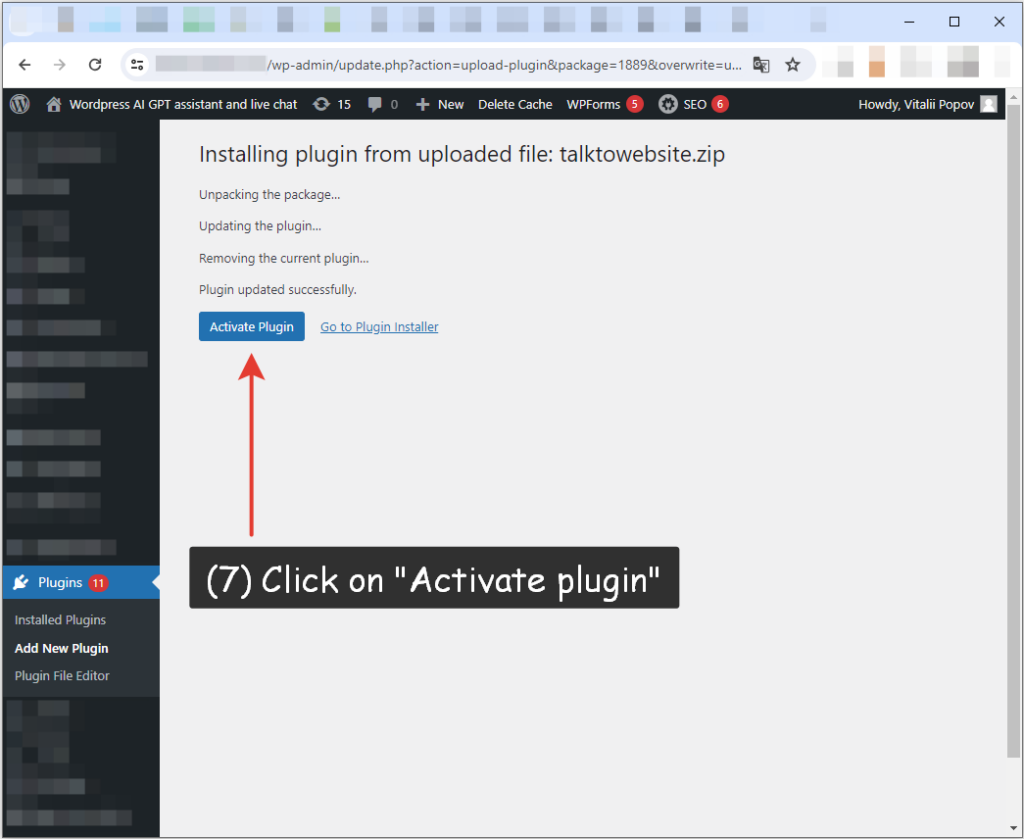
11. Developer start guide
- Download and run VSCode / PHPStorm / Any other PHP IDE
- Open plugin directory
- Use /admin folder to change administrative appearance
- Use /public folder to change public chat appearance
- Use /includes folder to change plugin engine
- Use /includes/class-talk-to-website-installer.php to change DB tables structure

